Replacing router's status LED lights with an I²C peripheral
I’ve been reading a bit about hardware hacking lately and I was eager to try to implement a simple mod myself to get a feel of it. Inspired by this forum thread I decided to free two GPIO pins by removing status LED lights from my old router and connect an I²C peripheral to it.
I had an old TP-Link WR740N v4 with OpenWRT firmware laying around and 128x32 SSD1306 OLED display. The first thing I needed to do was to patch the firmware so it won’t utilise all the status LEDs.
Patching the firmware
I created a debian vm, installed the dependencies and cloned the OpenWrt repository as described in OpenWrt’s docs.
sudo apt update
sudo apt install -y build-essential ccache ecj fastjar file g++ gawk \
gettext git java-propose-classpath libelf-dev libncurses5-dev \
libncursesw5-dev libssl-dev python python2.7-dev python3 unzip wget \
python3-distutils python3-setuptools python3-dev rsync subversion \
swig time xsltproc zlib1g-dev
git clone https://git.openwrt.org/openwrt/openwrt.git
cd openwrt
git pull
According to the OpenWrt’s wiki the last supported version for my router is 18.06.9 so I checked out the v18.06.9 tag and ran the feeds scripts:
git checkout v18.06.9
./scripts/feeds update -a
./scripts/feeds install -a
As described in the thread I mentioned earlier, we need to patch the linux/ar71xx/files/arch/mips/ath79/mach-tl-wr741nd-v4.c file to free some GPIOs. I decided to go for WAN (GPIO 13) and QSS (GPIO 1). In the code they are defied as follows:
#define TL_WR741NDV4_GPIO_LED_QSS	1
#define TL_WR741NDV4_GPIO_LED_WAN	13
I removed their entries from the tl_wr741ndv4_leds_gpio array:
diff --git a/target/linux/ar71xx/files/arch/mips/ath79/mach-tl-wr741nd-v4.c b/target/linux/ar71xx/files/arch/mips/ath79/mach-tl-wr741nd-v4.c
index 851b7624ff..5478ef475f 100644
--- a/target/linux/ar71xx/files/arch/mips/ath79/mach-tl-wr741nd-v4.c
+++ b/target/linux/ar71xx/files/arch/mips/ath79/mach-tl-wr741nd-v4.c
@@ -69,18 +69,10 @@ static struct gpio_led tl_wr741ndv4_leds_gpio[] __initdata = {
                .name           = "tp-link:green:lan4",
                .gpio           = TL_WR741NDV4_GPIO_LED_LAN4,
                .active_low     = 1,
-       }, {
-               .name           = "tp-link:green:qss",
-               .gpio           = TL_WR741NDV4_GPIO_LED_QSS,
-               .active_low     = 0,
        }, {
                .name           = "tp-link:green:system",
                .gpio           = TL_WR741NDV4_GPIO_LED_SYSTEM,
                .active_low     = 1,
-       }, {
-               .name           = "tp-link:green:wan",
-               .gpio           = TL_WR741NDV4_GPIO_LED_WAN,
-               .active_low     = 0,
        }, {
                .name           = "tp-link:green:wlan",
                .gpio           = TL_WR741NDV4_GPIO_LED_WLAN,
Compiling the firmware
According to the deviwiki my TP-LINK TL-WR740N v4.x has the Atheros AR9331 CPU.
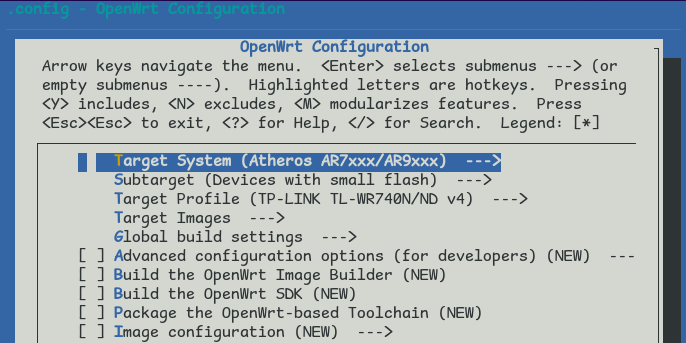
I ran make menuconfig and set the Target to Atheros AR7xxx/AR9xxx, Subtarget to Devices with small flash and the Target Profile to TP-LINK TL-WR740N/ND v4:
I also enabled:
-
the web interface from
LuCi > Collections: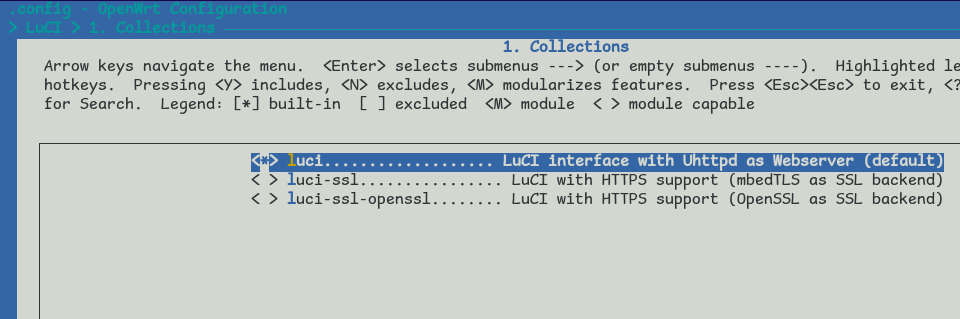
-
the
kmod-i2c-gpio-custommodule fromKernel modules > I2C Support: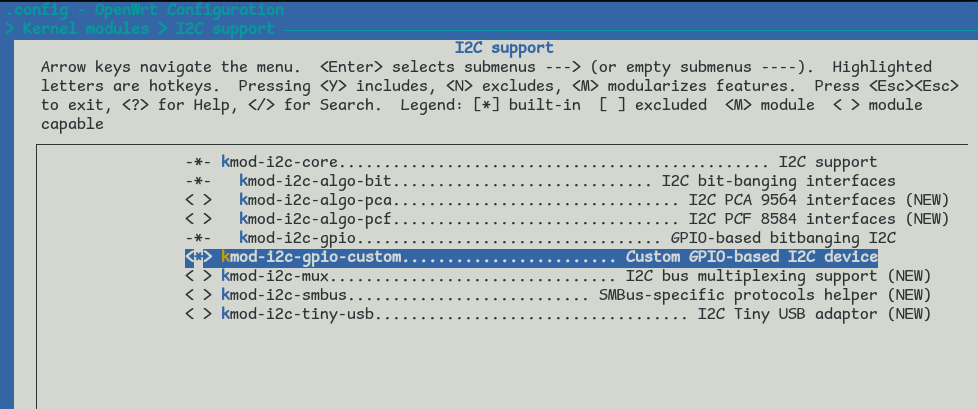
-
and the
i2c-toolsfromUtilities: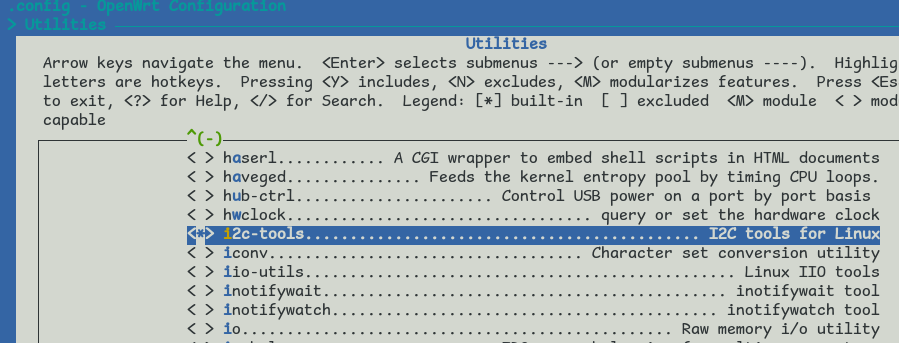
Then I compiled the firmware:
make -j$(nproc) kernel_menuconfig
make -j$(nproc) defconfig download clean world
Finally, I copied the bin/targets/ar71xx/tiny/openwrt-ar71xx-tiny-tl-wr740n-v4-squashfs-sysupgrade.bin image to another directory as no_leds.bin and flashed it using the OpenWrt web interface:
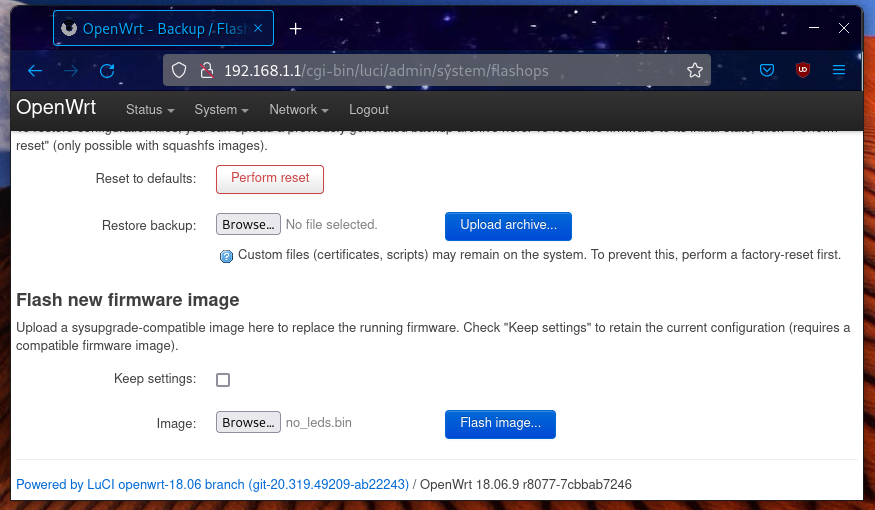
NOTE: Remember to use the appropriate image! I am using the -sysupgrade binary because I already had a version of OpenWrt running on my device.
Blink, blink…
Now that we have our patched firmware flashed, we should be able to control our LEDs. Let’s log in via SSH and run the following script on the router:
#!/bin/sh

echo "1" > /sys/class/gpio/export
echo out > /sys/class/gpio/gpio1/direction
echo "13" > /sys/class/gpio/export
echo out > /sys/class/gpio/gpio13/direction

for i in $(seq 1 2); do
  echo 1 > /sys/class/gpio/gpio1/value
  sleep 1
  echo 0 > /sys/class/gpio/gpio1/value
  sleep 1
done

for i in $(seq 1 2); do
  echo 1 > /sys/class/gpio/gpio13/value
  sleep 1
  echo 0 > /sys/class/gpio/gpio13/value
  sleep 1
done

echo "1" > /sys/class/gpio/unexport
echo "13" > /sys/class/gpio/unexport
It seems to work:
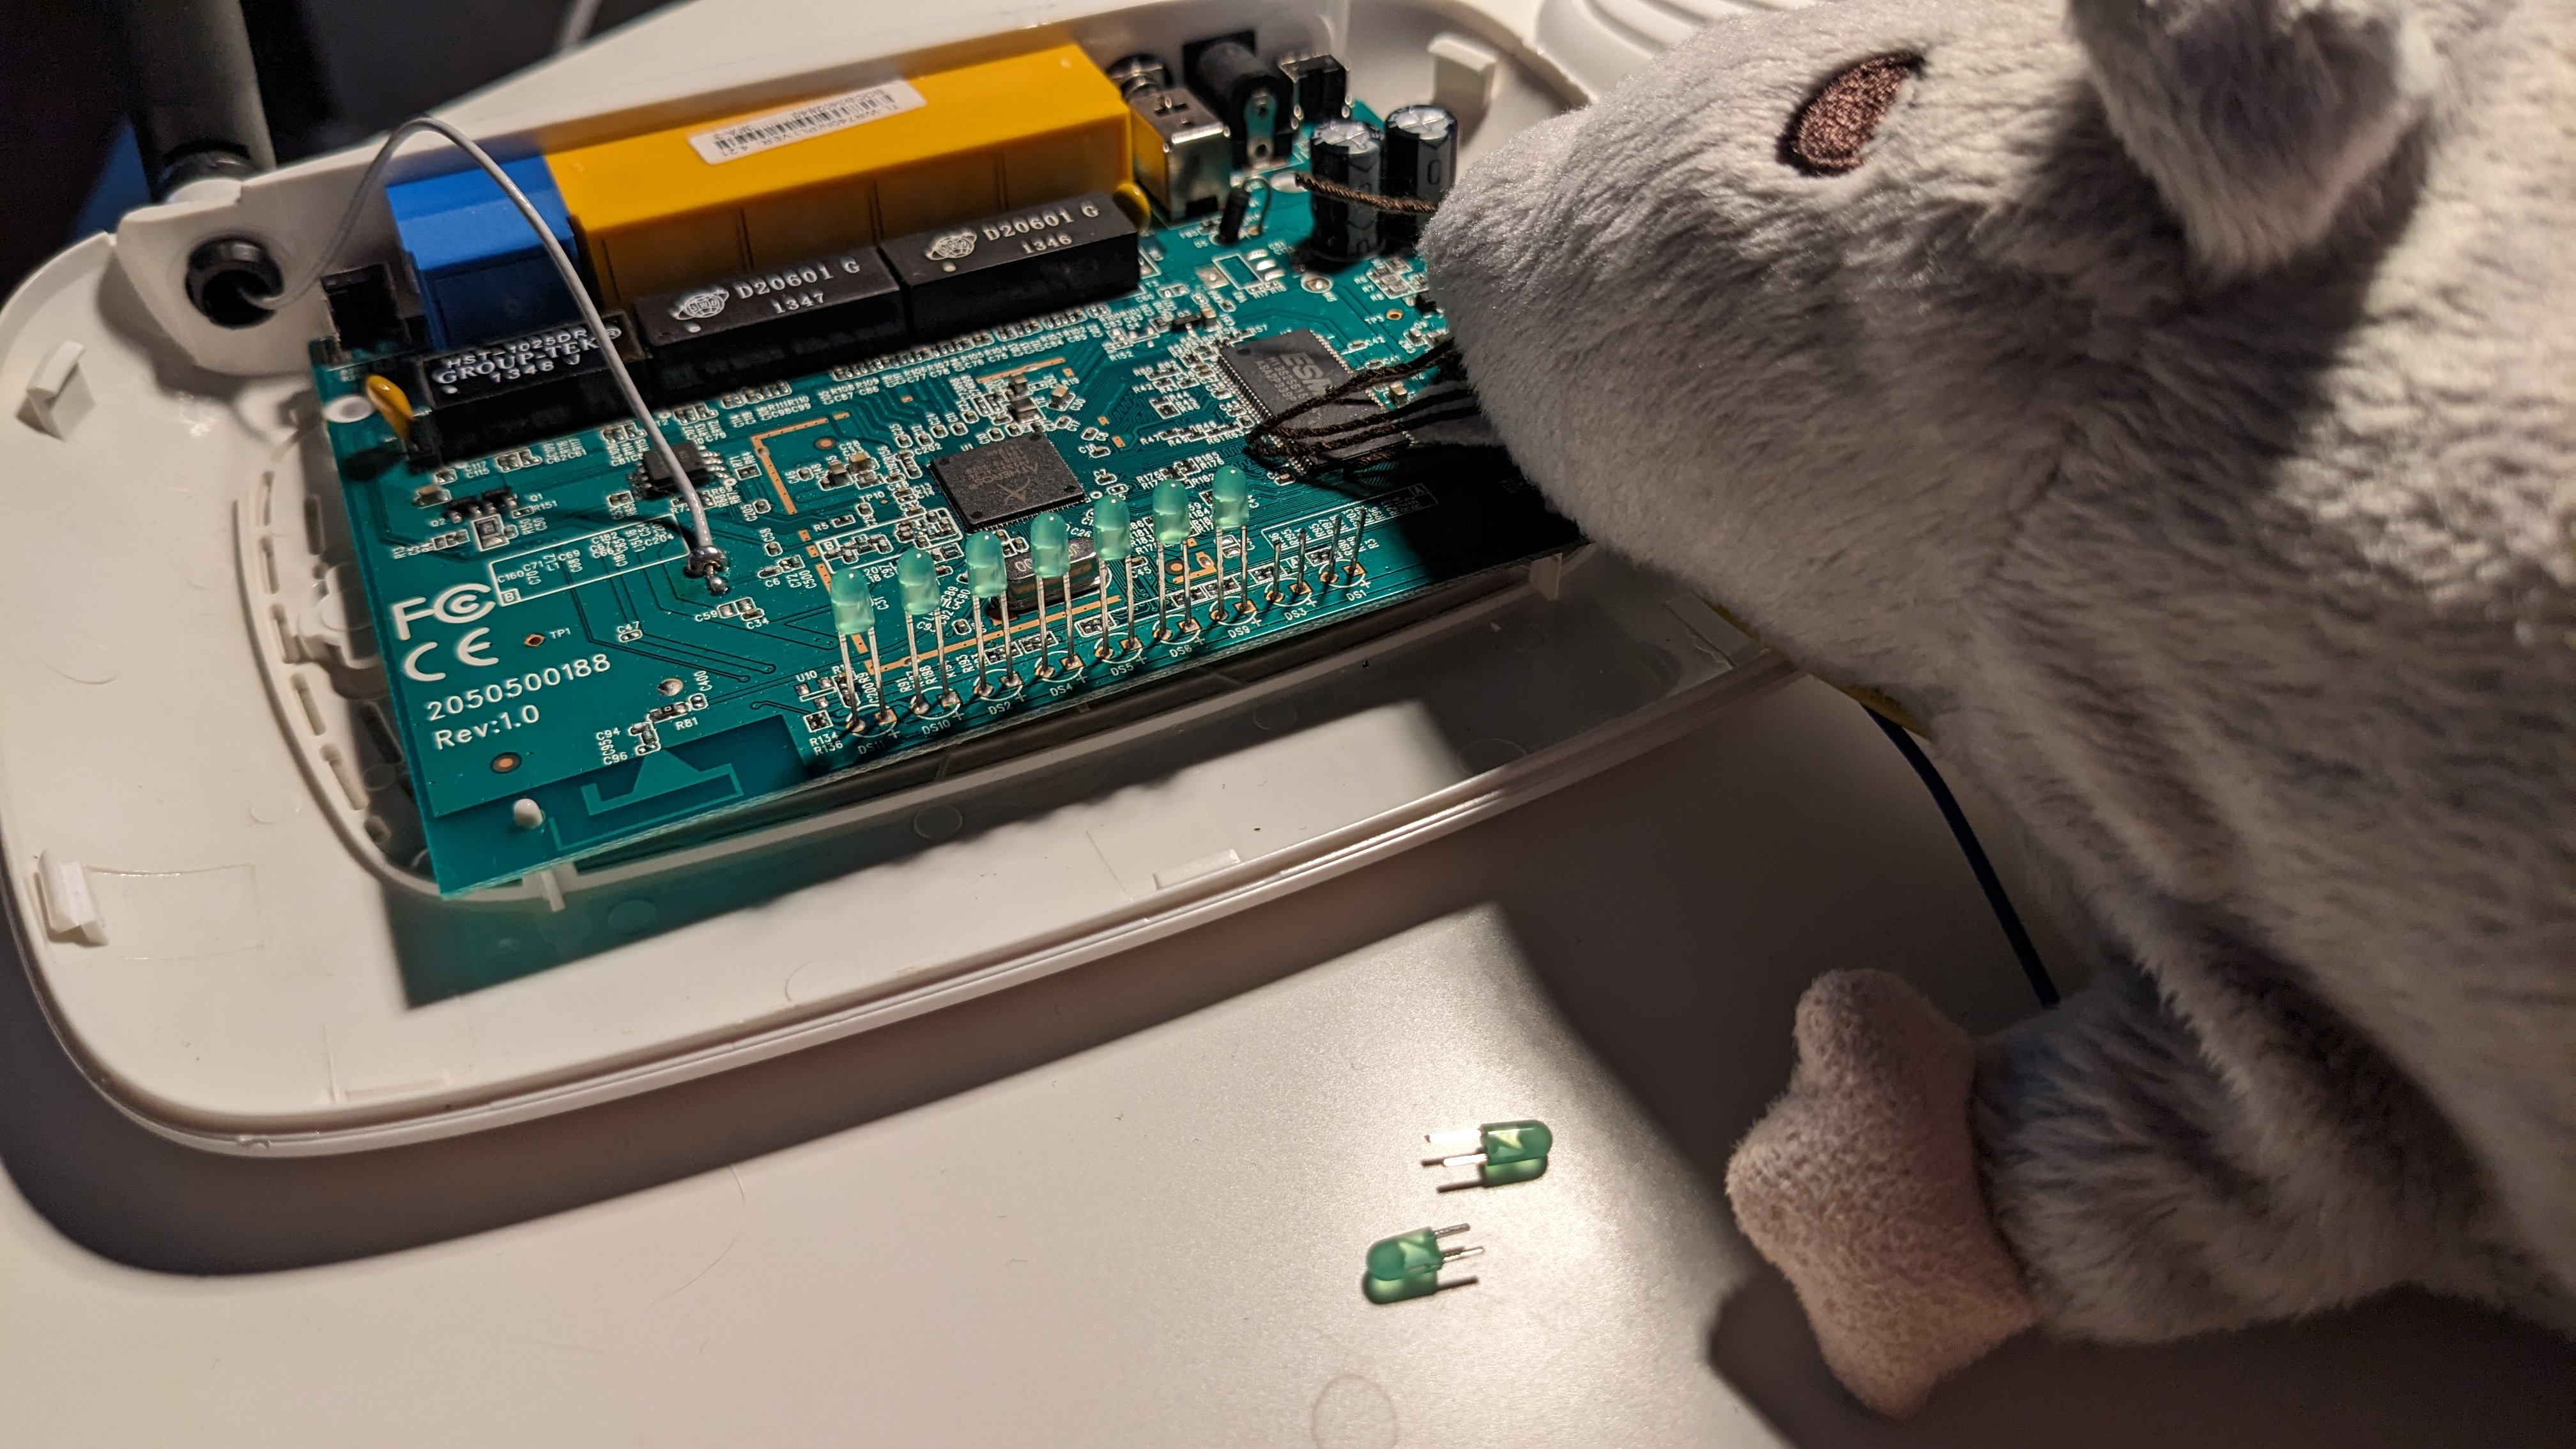
Removing LEDs
Now that we know, that we can control the GPIO, let’s remove the diodes. To avoid soldering I simply cut the terminals close to the top, so I can attach female jumper wires to them.
To make sure that it works, let’s rerun our blink script, but this time with the diodes on a breadboard:
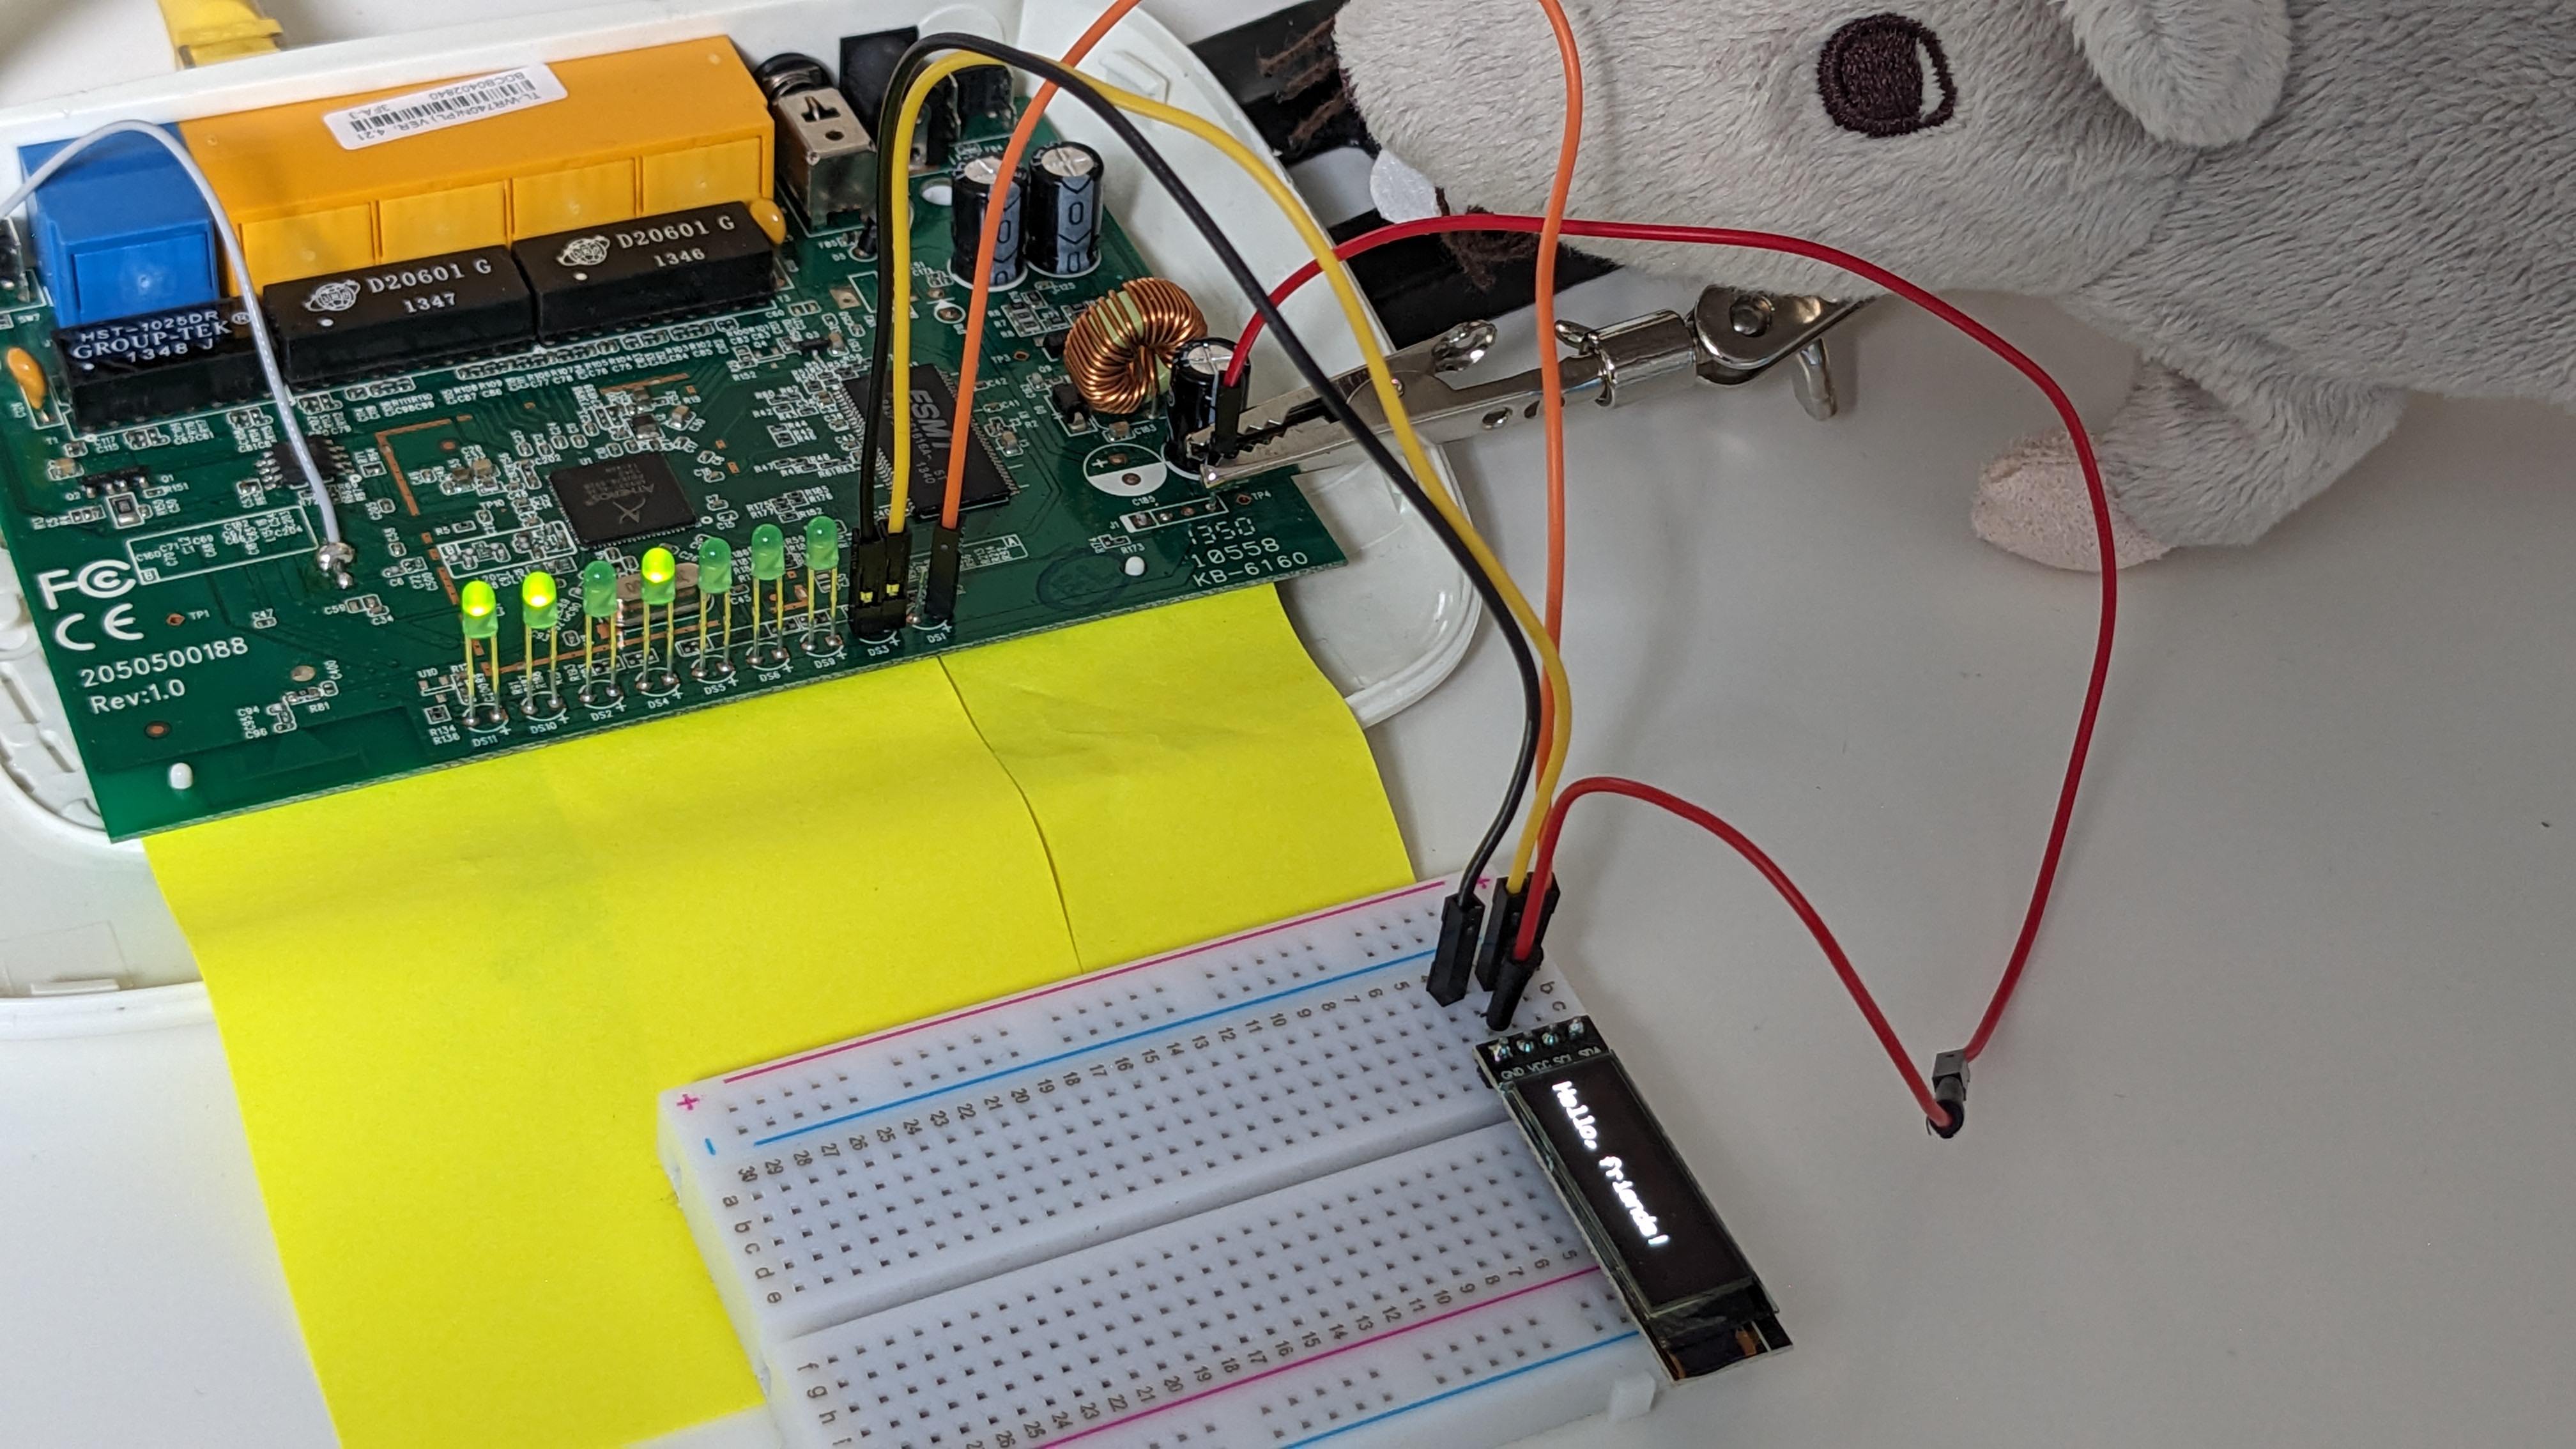
Connecting the OLED display
I connected the display in the following way:
- Router’s
GPIO 1to OLED’sSDA - Router’s
GPIO 13to OLED’sSCL - Router
GNDnext toGPIO 13to OLED’sGND - Router UART’s
VCCto OLED’sVCC
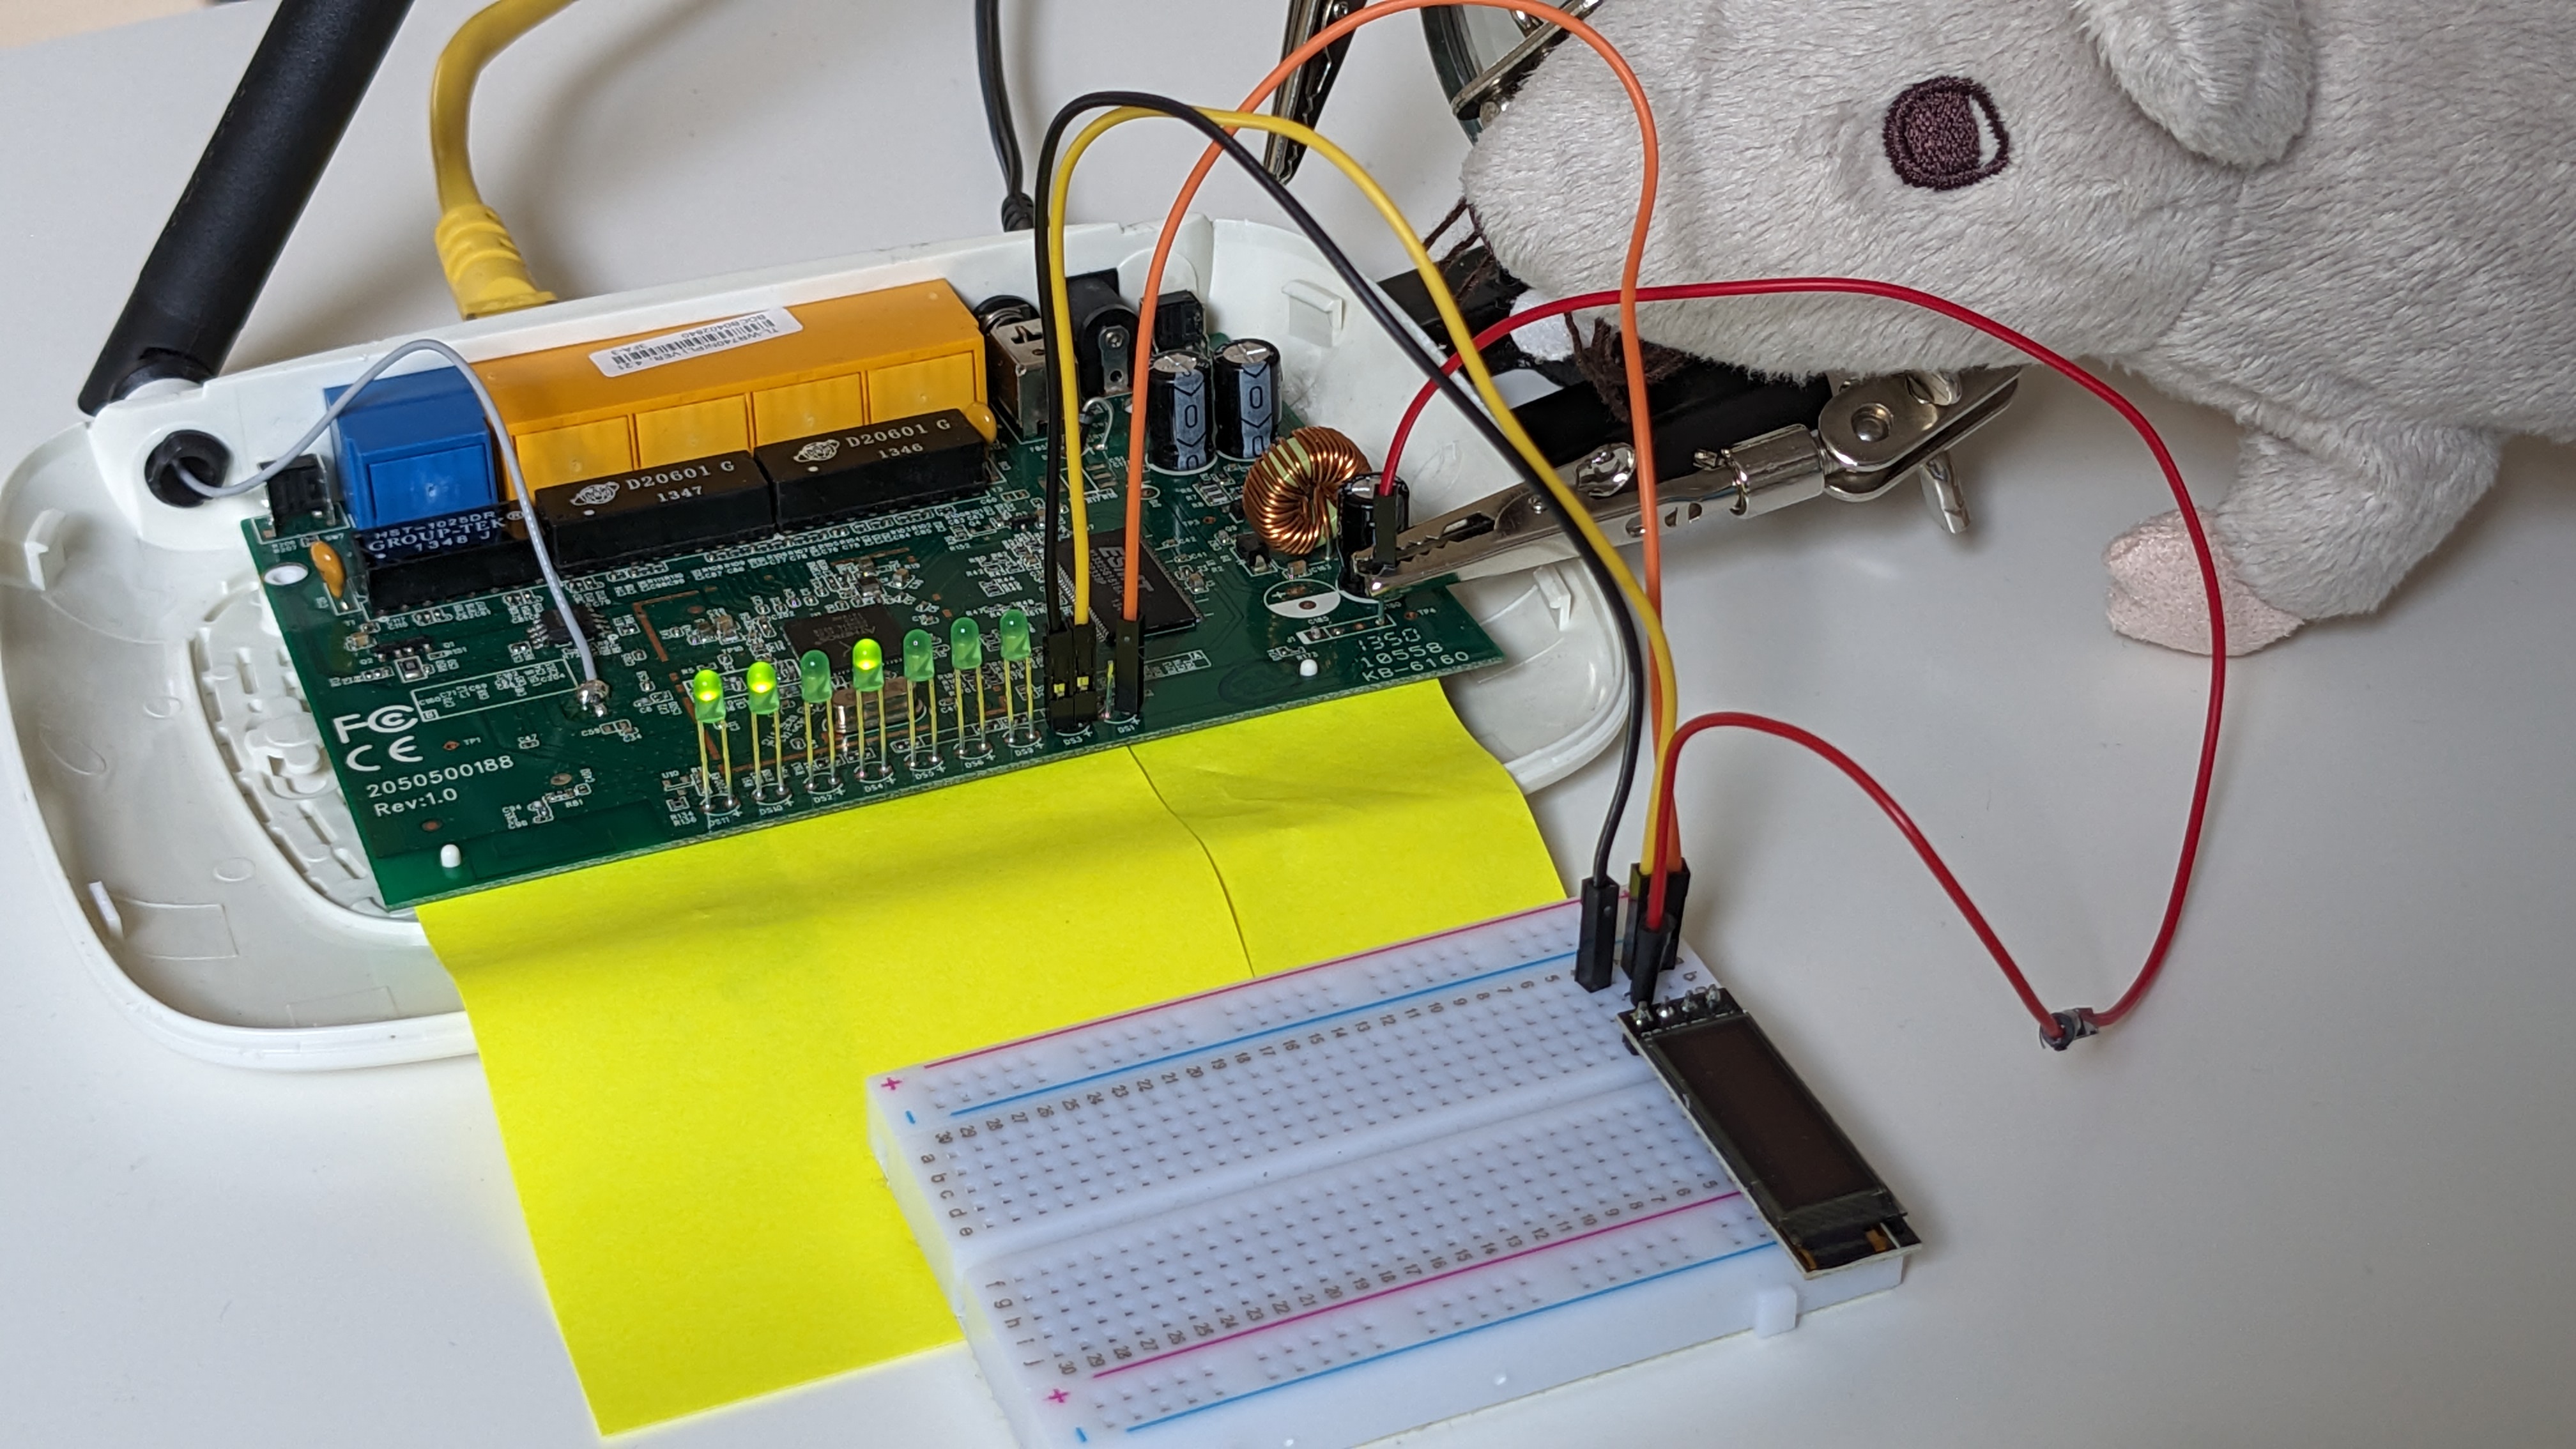
As you can see, to avoid soldering again I’m holding a male jumper wire with a helping hand over the UART's VCC.
Let’s configure the i2c-gpio-custom kernel module and run the i2cdetect utility:
root@OpenWrt:~# insmod i2c-gpio-custom.ko bus0=0,1,13

root@OpenWrt:~# #        params:      bus0=<device id>,<sda gpio>,<scl gpio>

root@OpenWrt:~# i2cdetect -y 0
     0  1  2  3  4  5  6  7  8  9  a  b  c  d  e  f
00:          -- -- -- -- -- -- -- -- -- -- -- -- --
10: -- -- -- -- -- -- -- -- -- -- -- -- -- -- -- --
20: -- -- -- -- -- -- -- -- -- -- -- -- -- -- -- --
30: -- -- -- -- -- -- -- -- -- -- -- -- 3c -- -- --
40: -- -- -- -- -- -- -- -- -- -- -- -- -- -- -- --
50: -- -- -- -- -- -- -- -- -- -- -- -- -- -- -- --
60: -- -- -- -- -- -- -- -- -- -- -- -- -- -- -- --
70: -- -- -- -- -- -- -- --
The address is 0x3c. Looks right.
Displaying some text
I decided to write some code in golang to control the display for two main reasons:
- It’s easy to code with the periph.io package
- It’s even easier to cross-compile
The disadvantage is that golang binaries are huge. There is TinyGo but it does not support MIPS. So it looks like I don’t have enough space in the root filesystem even for a hello world program. What I can do though, is to transfer the binary to the tempfs and run it from there. Since I’m just fooling around I’m ok with that.
I wrote the following code that reads the text from args and displays it on the OLED:
package main

/*
 * Based on https://pkg.go.dev/periph.io/x/devices/v3/ssd1306#example-package
 */

import (
	"fmt"
	"image"
	"log"
	"os"

	"periph.io/x/conn/v3/i2c"
	"periph.io/x/conn/v3/i2c/i2creg"
	"periph.io/x/devices/v3/ssd1306"
	"periph.io/x/devices/v3/ssd1306/image1bit"
	"periph.io/x/host/v3"

	"golang.org/x/image/font"
	"golang.org/x/image/font/basicfont"
	"golang.org/x/image/math/fixed"
)

func i2cBus() i2c.BusCloser {
	if _, err := host.Init(); err != nil {
		log.Fatal(err)
	}
	b, err := i2creg.Open("")
	if err != nil {
		log.Fatal(err)
	}
	return b
}

func ssd1306Device(b i2c.BusCloser) *ssd1306.Dev {
	var opts = ssd1306.Opts{
		W:             128,
		H:             32,
		Rotated:       false,
		Sequential:    true,
		SwapTopBottom: false,
	}
	dev, err := ssd1306.NewI2C(b, &opts)
	if err != nil {
		log.Fatalf("failed to initialize ssd1306: %v", err)
	}
	return dev
}

func displayText(dev *ssd1306.Dev, msg string) {
	img := image1bit.NewVerticalLSB(dev.Bounds())
	f := basicfont.Face7x13
	drawer := font.Drawer{
		Dst:  img,
		Src:  &image.Uniform{image1bit.On},
		Face: f,
		Dot:  fixed.P(0, img.Bounds().Dy()-1-f.Descent),
	}
	drawer.DrawString(msg)
	if err := dev.Draw(dev.Bounds(), img, image.Point{}); err != nil {
		log.Fatal(err)
	}
}

func main() {
	if len(os.Args) != 2 {
		log.Fatal("Please provide a text to display\n" +
			"Usage:\n" +
			"  " + os.Args[0] + " TEXT")
	}
	msg := os.Args[1]
	b := i2cBus()
	defer b.Close()
	dev := ssd1306Device(b)

	fmt.Printf("Displaying '%s'\n", msg)
	displayText(dev, msg)
}
Let’s cross-compile it and transfer the binary to the router:
go mod init searabbitx.github.io/oled
go mod tidy
env GOOS=linux GOARCH=mips GOMIPS=softfloat go build -ldflags="-s -w"
scp oled root@192.168.1.1:/tmp/
Finally, we can run it to display some text:
root@OpenWrt:~# cd /tmp
root@OpenWrt:/tmp# ./oled 'Hello, friends!'
Displaying 'Hello, friends!'
root@OpenWrt:/tmp#